Summary: While some individuals attempt to dive straight into intense, heavy workouts after years of physical inactivity, skipping a formal structural and Posture Assessment is a high-risk gamble with your biomechanics.
Launching a serious fitness chapter after 40 demands a flawless structural foundation; at this stage of life, there is simply no margin for error or dangerous trial-and-error guessing games. Musculoskeletal setbacks from an unvetted movement pattern or joint imbalance don’t just stall your progress—an unexpected injury can potentially sideline you for months, years, or even permanently put you out of action. Prioritizing a systematic Posture Assessment from the ground up is the only definitive way to build a sustainable, bulletproof fitness journey, allowing you to maximize performance while significantly reducing the risk of a debilitating structural breakdown.
- The Plumb Line: Your Posture Assessment Tool
- 1. The Posture Assessment Foundation: Why Foot Mechanics Dictate Alignment
- 2. The Knee Joint Posture Assessment: The Primary Victim of Kinetic Overcompensation
- The Lateral Hip & Pelvic Alignment: Posture Assessment of Hip Hiking and Adduction
- 4. The Upper Torso: Identifying Shoulder Asymmetries and Scapular Winging
- 5. The Cervical Stack: Halting Forward Head Deviation [Sagittal plane view]
- The Center of Gravity: Spotting Anterior vs. Posterior Pelvic Tilt [Sagittal plane view]
- The Recovery Timeline: Corrective Limits and Clinical Boundaries
- What to Expect from a Clinical Evaluation
- The Posture Assessment Matrix: Why Small Details Matter
- For – Brands | Businesses | Coaches
When you finally decide to level up your strength, mobility, or running performance after 40, the natural instinct is to dive straight into the hard work. You hit the gym and start heavy lifting, high-intensity intervals, or pushing for extra mileage on the treadmill or road. It is easy to find yourself chasing the level of fitness you enjoyed in the past, wishing to pick up exactly where you left off.
However, it is easy to overlook the compounding physical toll of a sedentary lifestyle. Age-related structural shifts, such as sarcopenia (the natural decline in muscle mass), evolving hormonal profiles, and progressive joint capsule tightness, are already quiet variables in your training equation.
If you load a building on a compromised foundation, the structural integrity eventually fails. Your body operates under the exact same laws of physics. Before you challenge your neuromuscular system with heavy loads or repetitive joint impact, you must establish an objective baseline grounded strictly in your current kinetic alignment.
This is where a systematic static postural assessment becomes non-negotiable.
By observing how your kinetic chain naturally stacks against gravity across major joint complexes (ankles, knees, hips, shoulders, and occiput), you expose the hidden imbalances that inhibit movement efficiency. While a certified fitness professional is trained to map these precise structural discrepancies, understanding this vertical alignment framework yourself is the absolute core to protecting your joints and achieving true lifetime athletic longevity.
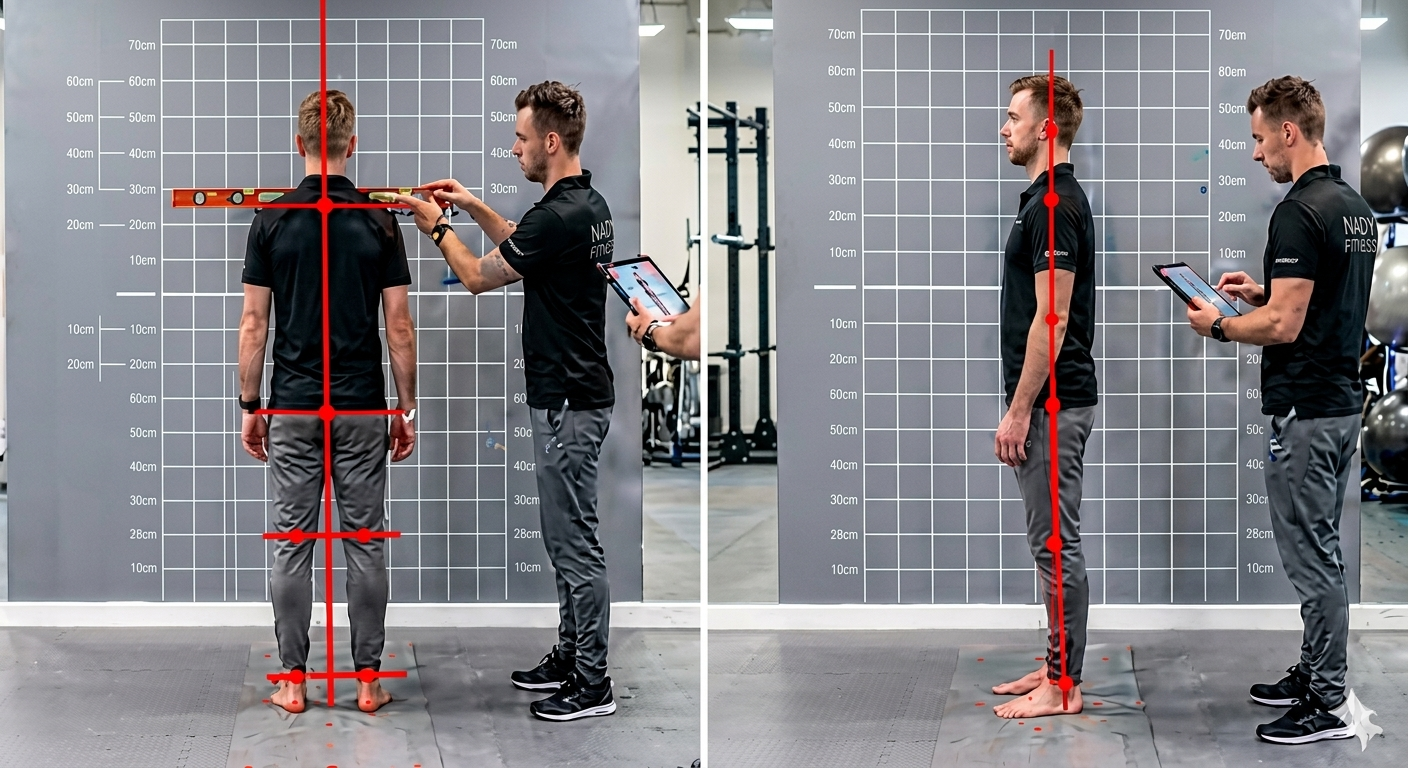
The Plumb Line: Your Posture Assessment Tool
Before diving into individual joint mechanics, it is essential to understand the primary diagnostic tool of this blueprint: the plumb line. While modern fitness marketing often pushes expensive, proprietary digital posture apps and automated grid software, the foundational standard for vertical alignment testing remains completely open-source. Dating back thousands of years to ancient architecture, a physical plumb line – a simple cord with a suspended weight, provides an absolute, un-gameable vertical axis (Y- axis) relative to gravity.
A plumb line is a simple string hanging from a fixed point overhead with a small, weighted object tied to its end, suspended about an inch above the floor. Positioned in front of a wall with grid markings, it becomes an incredibly precise tool for detecting structural deviations.
To analyze these structural alignments, professionals use a traditional plumb line to theoretically bisect the body into two symmetrical halves. Evaluating your body against a vertical plumb line is a scientifically validated method for detecting subtle kinetic deviations across multiple planes of motion.
Frontal Plane Alignment: When facing the plumb line, the string should pass perfectly equidistant between your feet, directly between the inner ankle bones (medial malleoli). In an ideal state, it bisects your body into symmetrical left and right halves. Your joint pairs remain perfectly equidistant from the line as it travels upward, intersecting the pubic symphysis, navel (umbilicus), sternum, chin (mandible), and the midline of the face.
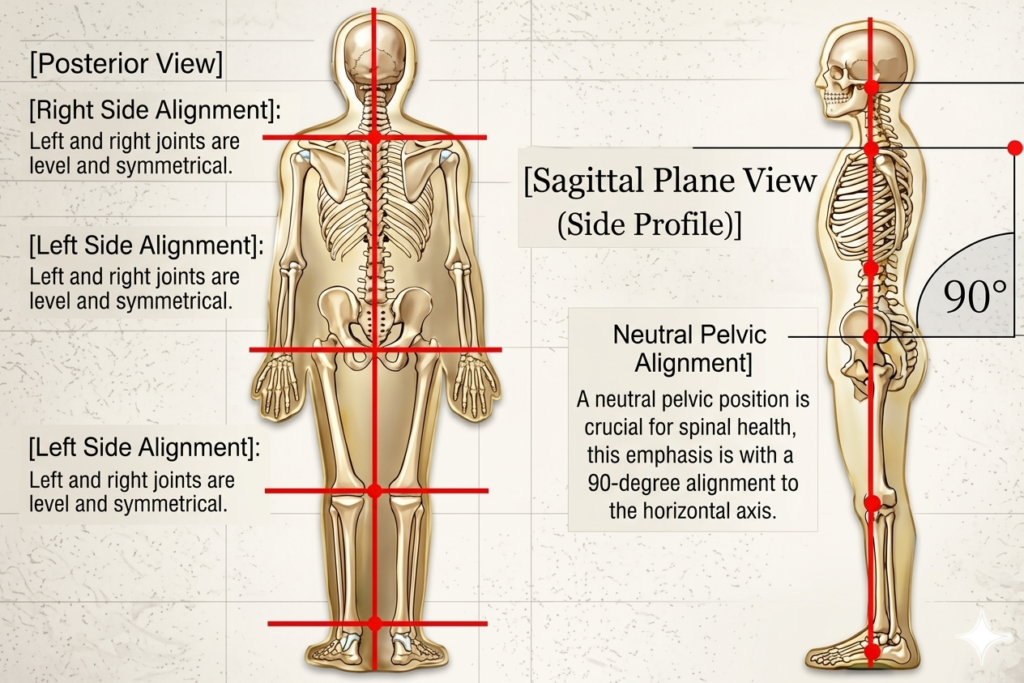
The 90-Degree Orthogonal Rule: The core principle relies on evaluating the horizontal axes connecting your bilateral joint pairs (e.g., matching left and right biacromial or bi-iliac lines). In a balanced skeletal frame, these horizontal joint axes must intersect the vertical plumb line at an exact 90-degree right angle. Any angular deviation indicates a structural asymmetry, lateral pelvic hike, or unilateral muscular imbalance.
Sagittal Plane Alignment (Side Profile): When viewed sagittally, the plumb line shifts roles to detect anterior or posterior pelvic tilts, rounded shoulders, and forward head posture. A veteran practitioner views these joint segments holistically; they can instantly map how an restriction in an ankle or hip forces a cascading, multi-segment compensation pattern all the way up the kinetic chain.
The Lateral Checklist: From the Ground Up
To execute this sagittal and frontal evaluation flawlessly without advanced software, you simply need a piece of string, a heavy washer or set of keys to act as a weight, and a qualified trainer utilizing a smartphone camera to capture your alignment against these vertical anatomical checkpoints:
- The Ankle (The Anchor) – The plumb line should pass slightly anterior (just in front of) the lateral malleolus (the bony protrusion on the outside of your ankle). This establishes your true vertical baseline relative to the ground.
- The Knee Joint (Joint Strain) – The line should pass slightly anterior to the midline of the knee joint, running just behind the patella (kneecap). If the line passes far behind the knee, it flags hyperextension (genu recurvatum); if it passes too far forward, it indicates chronic quadriceps overload.
- The Hip and Pelvis (Pelvic Displacement & Sagittal Tilt) – The line must pass directly through the greater trochanter (the distinct bony protrusion on the side of your upper thigh bone). This is your primary indicator for pelvic migration. If the pelvis tilts forward relative to the line, it indicates an anterior pelvic tilt (hyper-lordosis and tight hip flexors); if it tilts backward, it reveals a posterior pelvic tilt (flat-back alignment), while an unbraced forward shift exposes a structural swayback.
- The Trunk and Spine (Spinal Curvature & Asymmetry) – The line should cut midway through the torso and the lumbar vertebral bodies, running directly through the midline of the ribcage to spot exaggerated front-to-back “S-curves” (hyper-lordosis or thoracic kyphosis). Note on Frontal Asymmetry: While this sagittal view tracks forward/backward deviations, any visible side-to-side spinal lateral deviation or shoulder-height dropping caught during the frontal assessment can indicate scoliosis, a structural lateral curvature of the spine that requires clinical evaluation before loading with heavy weights.
- The Shoulder (Scapular Protraction) – The line must bisect the center of the acromion process (the bony tip at the top-outer edge of the shoulder). If your shoulder sits forward of the line, it indicates overactive, hyper-tight chest muscles and a weak upper back.
- The Head and Neck (Forward Head Posture) – The line should pass directly through the external auditory meatus (the ear canal). For every inch your ear sits forward of this line, you add roughly an extra 10 pounds of leverage strain to the cervical spine.
1. The Posture Assessment Foundation: Why Foot Mechanics Dictate Alignment
A thorough posture assessment always starts from the ground up. Your feet and ankles are the only contact points your body has with the earth; they act as your primary shock absorbers and force transmitters, distributing dynamic impacts so that no single joint bears extreme, isolated mechanical stress.
The subtalar joint is the very first mechanism to manage your connection to the ground, triggering the kinetic signals your brain uses to coordinate movement. Because the body operates as a continuous kinetic chain, a structural issue at the ankle immediately alters the position of the shin bone (tibia) and forces a compensatory rotation of the thigh bone (femur). This means an unresolved issue in your feet can cause faulty adaptations all the way up the chain.
The Pain Point (Subtalar Pronation): If your subtalar joint pronates or collapses inward, it forces an unnatural internal rotation of your tibia and a corresponding internal shift of your thigh bone (femur). Mapping horizontal lines across your joint complexes quickly illustrates how a collapsing base forces the upper torso to overcompensate, often leading to an unlevel shoulder drop or a structural neck shift away from the center line.
The Solution: To restore an athletic, resilient arch and stabilize the ankle complex, you must target foundational foot dynamics directly through targeted neuromuscular re-education:
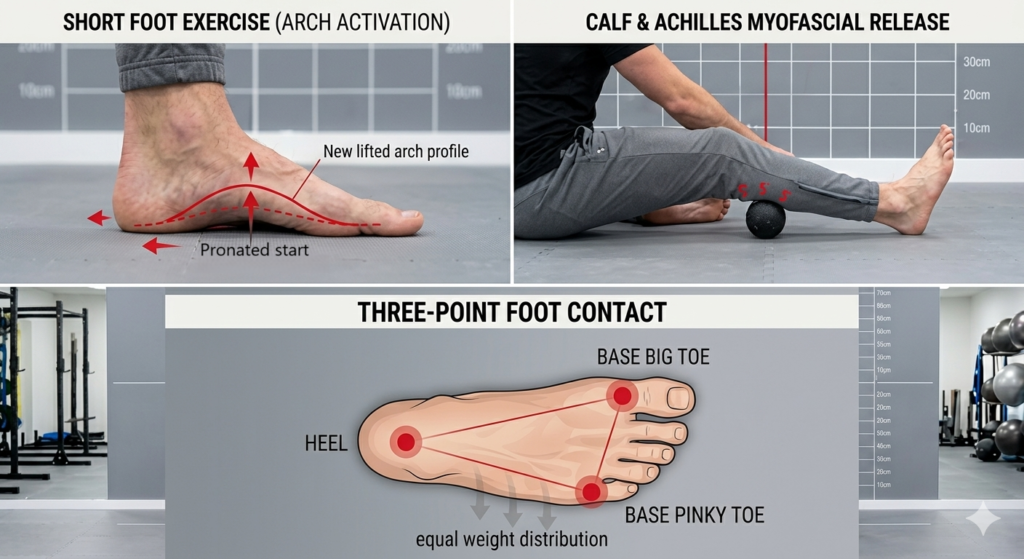
- Short Foot Exercises (Arch Activation): Pull the ball of your foot toward your heel without curling your toes, actively lifting your medial arch off the floor to re-engage the tibialis posterior.
- Calf & Achilles Myofascial Release: Use a lacrosse ball or foam roller to roll out the gastrocnemius and soleus, clearing the chronic tightness that forces the foot to pronate just to find ground contact.
- Three-Point Foot Contact Drills: Practice standing or performing bodyweight movements while forcing equal weight distribution through the three pillars of your foot: the heel, the base of the big toe, and the base of the pinky toe.
2. The Knee Joint Posture Assessment: The Primary Victim of Kinetic Overcompensation
Moving up the plumb line for posture assessment, the knees should sit perfectly equidistant from the vertical axis. When your foundation is aligned, the knees naturally track forward over the second and third toes during movement. However, because the knee is a modified hinge joint trapped tightly between the ankle and the hip, it often becomes the primary victim of kinetic imbalances elsewhere.
The Pain Point (Valgus Stress & Inward Collapse): When the subtalar joint pronates, that cascading internal rotation of the tibia and femur pulls the knee joints inward toward the plumb line – a presentation known as dynamic knee valgus. Forcing a squat, lunge, or running stride through this inward collapse pulls your joint out of its functional tracking groove. Loading this structural flaw under heavy barbell resistance or repetitive road impact doesn’t build resilience; it simply accelerates mechanical wear on your articular cartilage and meniscus.
The Solution: Correcting knee tracking requires a dual approach: waking up the lateral hip stabilizers to control femoral rotation, alongside isolated training to build terminal extension control.
- Banded Lateral Monster Walks: Place a resistance band around your ankles or just above your knees. Step laterally while keeping your feet straight and consciously driving your knees outward against the band’s tension to aggressively activate the gluteus medius
- Poliquin Step-Ups: Stand on a low box or step, drop one heel down to touch the floor by bending exclusively at the target knee, and drive back up to full extension. This restricted range selectively isolates and strengthens the Vastus Medialis Oblique (VMO), which is the critical “teardrop” stabilizer responsible for healthy patellar tracking.
- Terminal Knee Extensions (TKEs): Loop a heavy resistance band directly behind your knee joint capsule, face the anchor point, and step back until the band is taut. Flex the knee slightly, then actively contract your quadriceps to drive the joint back into full terminal extension, cementing dynamic tracking control under tension.
The Lateral Hip & Pelvic Alignment: Posture Assessment of Hip Hiking and Adduction
Continuing up our vertical plumb line framework for posture assessment, we analyze the hips and pelvis from a posterior (back) view. In an ideal, balanced state, a horizontal axis drawn across the top of your hip bones (the iliac crests) should sit perfectly level, forming an exact 90-degree right angle with the vertical plumb line. However, asymmetrical muscle weaknesses or structural imbalances frequently pull this level axis out of square.
Note: While the pelvis can also tilt forward or backward (Anterior vs. Posterior Pelvic Tilt), those specific deviations require a profile, sagittal plane view (side view) to accurately detect. Because they alter your entire center of gravity, we will dive deeply into those sagittal pelvic deviations and corrective solutions in a dedicated section further down this post.
The Pain Point (Hip Adduction & Hip Hiking)
When looking at your body from the back, a primary deviation occurs when one hip sits noticeably higher than the other – a phenomenon known clinically as “hip hiking” or lateral pelvic tilt. This asymmetry is frequently evident in individuals with a functional or structural limb-length discrepancy, but it can also be triggered by daily habits like habitually sleeping on one side or shifting all your weight onto a single leg while standing.
Mechanically, if your right hip is elevated (hiked), the pelvis tilts laterally, moving the hiked hip into a relative state of hip adduction. This faulty skeletal positioning alters the spine’s center of gravity and progressively weakens the lateral hip abductors (primarily the gluteus medius) on the lengthened side, rendering them unable to stabilize the pelvis during single-leg tasks like walking, running, or lunging.
The Solution: Leveling the Pelvic Axis
To restore a perfectly horizontal pelvic alignment, you must release the overactive lateral musculature pulling the hip upward while aggressively strengthening the weakened hip abductors responsible for lateral stability:
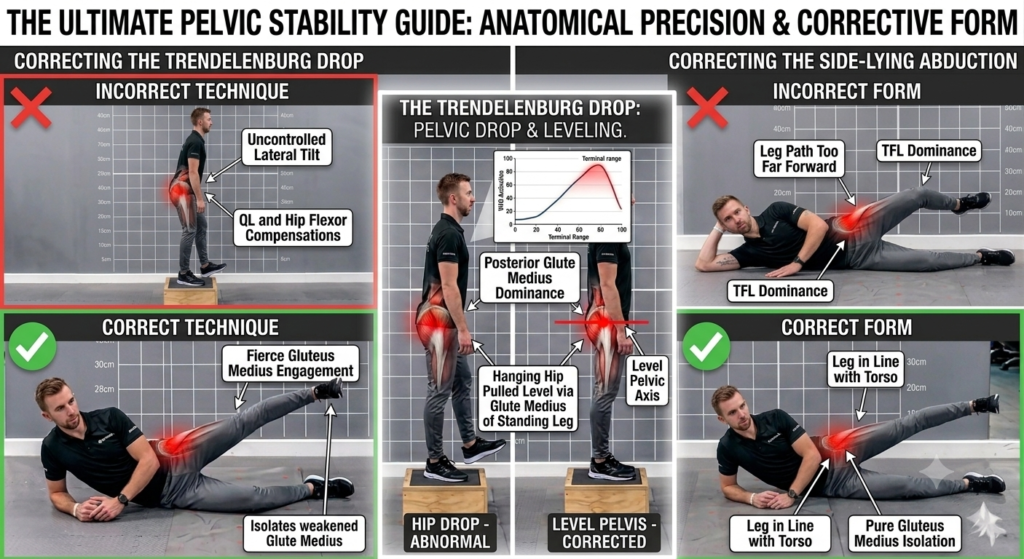
- Side-Lying Hip Abductions: Lie on your side with your bottom leg bent for support and your top leg completely straight. Keeping your top foot slightly internally rotated (toes pointing subtly downward to prevent TFL dominance), drive the top leg slightly backward and upward to aggressively re-engage and isolate the weakened gluteus medius.
- The Trendelenburg Drop (Pelvic Drops): Stand sideways on a low step or box with one foot hanging off the edge. Keeping both knees completely locked and straight, slowly lower the hanging hip downward by tilting the pelvis laterally, then use the hip abductors of the standing leg to pull the pelvis back up into a level, neutral position.
- Quadratus Lumborum (QL) Release & Stretch: Hip hiking is heavily driven by a hyper-tight quadratus lumborum muscle on the elevated side pulling the pelvis up toward the rib cage. Position a massage ball into the soft tissue of your lower back between the top of your hip bone and your lower ribs to release the restriction, followed by deep lateral side bends to lengthen the muscle.
4. The Upper Torso: Identifying Shoulder Asymmetries and Scapular Winging
Moving above the pelvis posture assessment, our vertical plumb line intersects the sternum and splits the chest. Modern desk environments create pronounced distortions in the thoracic spine and shoulder girdle. While the glenohumeral (ball-and-socket) joint is highly mobile, it relies completely on the stability of the scapulothoracic joint (where the shoulder blade meets the rib cage).
In a healthy overhead movement, these two systems share the load: the scapulothoracic joint contributes roughly 60° of rotation, while the glenohumeral joint handles the remaining 120°. When this rhythmic ratio breaks down, localized joint wear is drastically accelerated.
The Pain Point (Shoulder Drop & Scapular Winging)
A primary visual deviation occurs when the shoulders are not level against the horizontal axis, typically driven by hyper-tightness in the upper trapezius or levator scapulae on the elevated side. Concurrently, long hours slouched over a keyboard cause the shoulder blades to drift away from the spine (scapular protraction) or lift completely off the rib cage wall (scapular winging).
To spot this during a static assessment, a professional evaluates the resting position of the scapulae. In a balanced frame, the vertebral (medial) border of the shoulder blade should sit flat against the ribs, positioned vertically between the second and seventh ribs, and roughly 3 inches (7.6 cm) away from the spine’s spinous processes. When weak scapular stabilizers (primarily the rhomboids and serratus anterior) fail to maintain this baseline, the shoulder blade wings out.
Trying to push heavy overhead loads or execute bench presses in this state forces the glenohumeral joint to overcompensate for that missing 60° of scapular movement – rapidly grinding down your rotator cuff tendons.
The Solution: Restoring Scapulothoracic Stability
You must open up the restricted chest musculature pulling the shoulders forward while actively waking up the mid-back stabilizers that pull the shoulder blades flat into their ideal resting alignment:
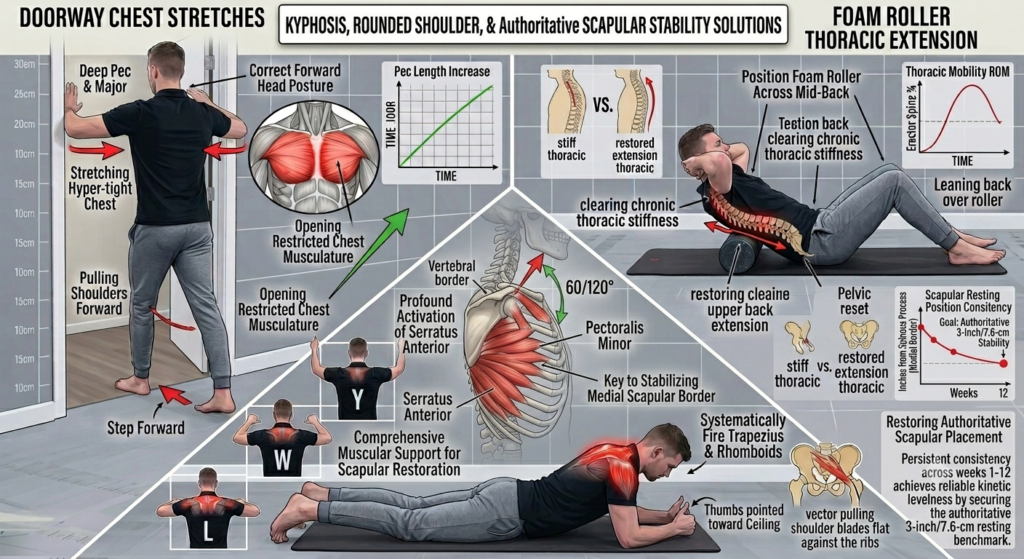
- Doorway Chest Stretches: Stand in a doorway with your elbows bent at 90° against the frame. Step forward gently to stretch the hyper-tight pectoralis major and minor, which are actively pulling your shoulders into a protracted state.
- Prone Y-T-W-L Scapular Drills: Lie face down on the floor and use your arms to form the letters Y, T, W, and L with your thumbs pointed toward the ceiling. Squeeze your shoulder blades together tightly at the top of each rep to systematically fire the middle and lower trapezius, rhomboids, and posterior deltoids, pulling the medial border back toward its ideal resting alignment.
- Foam Roller Thoracic Extension: Position a foam roller horizontally across your mid-back. Support your neck with your hands, keep your hips firmly on the floor, and gently lean back over the roller to clear chronic thoracic stiffness and restore the upper back extension required for healthy shoulder tracking.
5. The Cervical Stack: Halting Forward Head Deviation [Sagittal plane view]
The next primary posture assessment checkpoint with the vertical plumb line switches to the sagittal profile (side view), passing directly through the earlobe and the shoulder complex.
The Pain Point (Forward Head Posture): In a perfectly balanced posture, your earlobe must align vertically directly over the acromion process (the bony point at the top of your shoulder). However, “desk neck” shifts the earlobe significantly forward of this landmark. This deviation indicates severe hyper-tightness in the cervical extensors at the base of the skull, combined with a profound elongation and inhibition of the deep cervical flexors at the front of the neck.
Every inch your head drifts forward multiplies the relative weight your lower cervical spine has to hold up against gravity, causing unremitting upper back tension, chronic headaches, and a severe restriction in your overhead mobility.
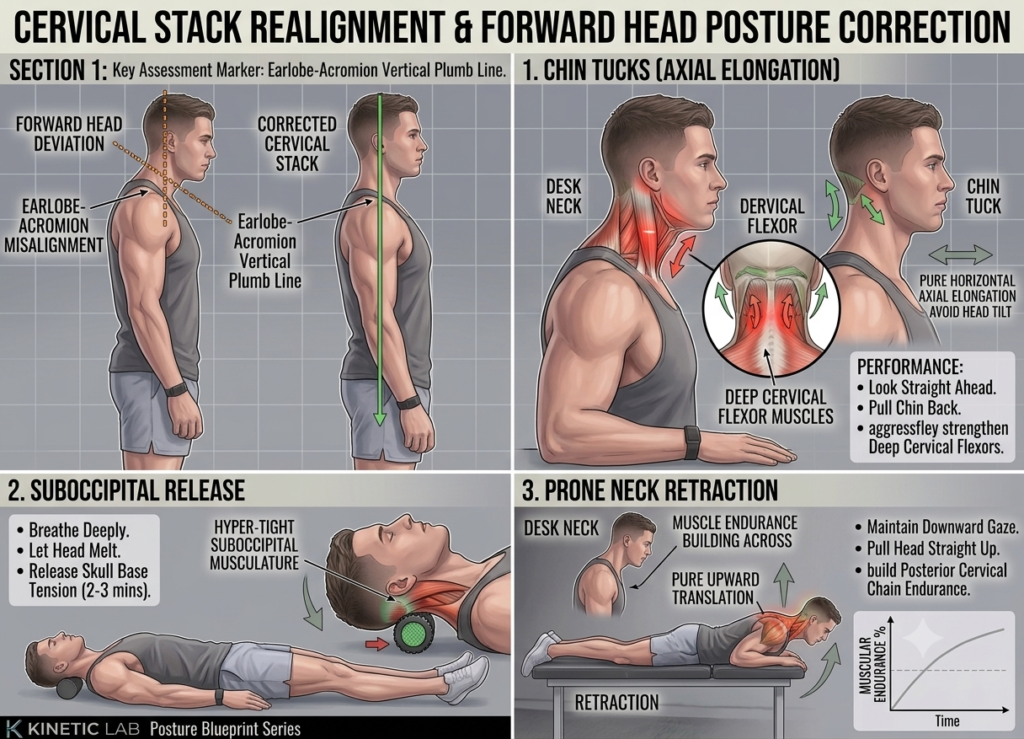
The Solution: Correcting the cervical stack requires a dual approach of releasing the tight musculature at the skull base while shortening and strengthening the weak stabilizers at the front:
- Chin Tucks (Axial Elongation): Look straight ahead and pull your chin straight back, as if making a “double chin” without tilting your head down. This pure axial elongation stretches the restricted suboccipital muscles while aggressively strengthening the deep cervical flexors. Hold for 3–5 seconds per rep.
- Suboccipital Release: Position a massage ball, foam roller, or dedicated suboccipital release tool directly under the base of your skull while lying on your back. Breathe deeply, relax your jaw, and let the weight of your head melt into the pressure for 2–3 minutes to clear the hyper-tightness forcing your head forward.
- Prone Neck Retraction: Lie face down on a treatment bench or the floor with your forehead floating roughly one inch off the surface. Pull your entire head straight up toward the ceiling via pure upward translation while keeping your gaze locked directly downward. Avoid lifting your chin, building vital endurance across the entire posterior cervical chain.
The Center of Gravity: Spotting Anterior vs. Posterior Pelvic Tilt [Sagittal plane view]
Shifting our posture assessment focus down to the body’s primary center of gravity, the next critical checkpoint is the relationship between your pelvis and your navel (umbilicus). In a balanced skeletal frame, the pelvis sits level, acting as a neutral “bucket” that supports the entire weight-bearing base of your spine.
However, modern lifestyle habits and muscle imbalances frequently tilt this bucket in one of two opposite directions, radically changing your structural alignment:
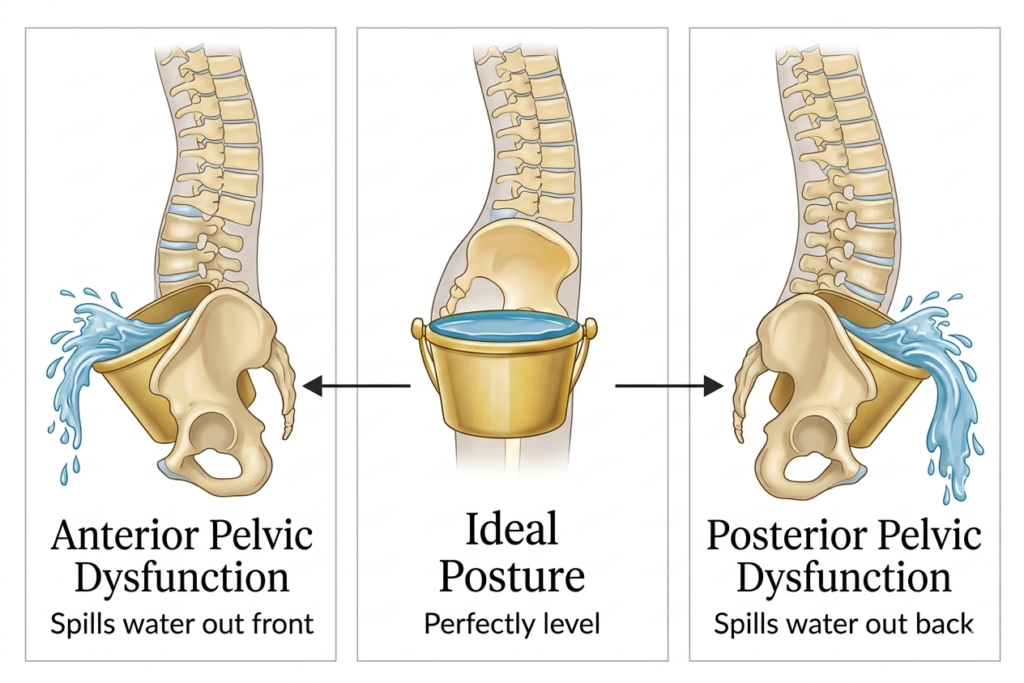
The Anterior Pelvic Tilt (Spilling Water Forward)
The Pain Point: Spending hours sitting at a desk chronically shortens and tightens your primary hip flexors, specifically the psoas major and iliacus. Similarly, consistently sitting with a thick wallet in a back pocket introduces an artificial lateral pelvic tilt, inhibiting the opposite gluteal complex and sending a cascading wave of compensation all the way up to the shoulders and neck.
When you stand up, those hyper-tight hip flexors pull the anterior profile of your pelvis downward, causing your lower back to arch excessively (increased lumbar lordosis) while neurologically inhibiting your core. Loading this structural distortion shifts the entire mechanical burden onto your lower lumbar segments, resulting in chronic tightness and premature facet joint wear.
The Solution:
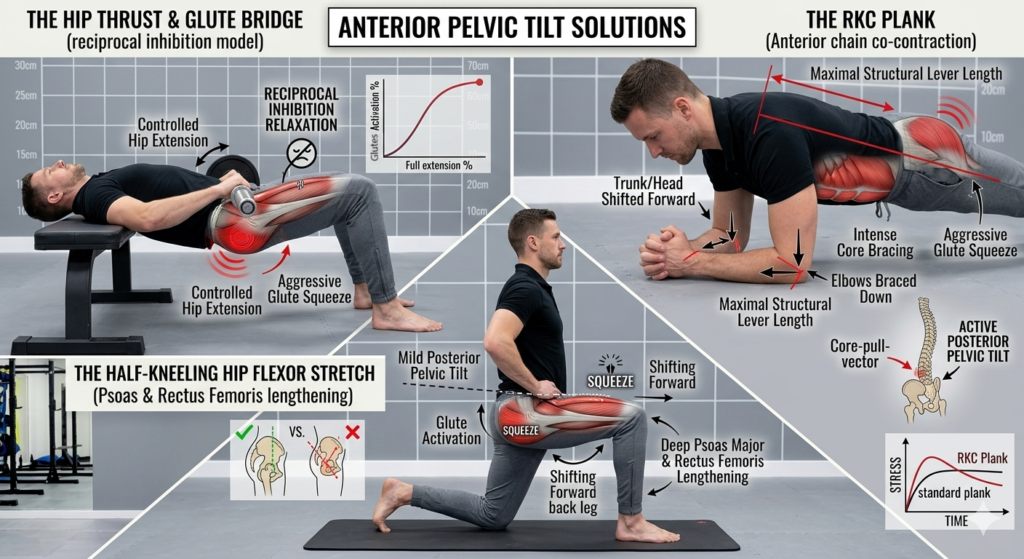
- The Hip Thrust & Glute Bridge: Your absolute gold standard. Driving your hips into full extension under control forces a deep, concentrated activation of the gluteus maximus, while naturally forcing the hyper-tight hip flexors to relax via reciprocal inhibition.
- The Half-Kneeling Hip Flexor Stretch: Step into a half-kneeling lunge. Actively squeeze the glute of the back leg to force a mild posterior pelvic tilt before shifting forward, deeply lengthening the psoas major and rectus femoris without hyperextending your lower back.
- The RKC Plank: Unlike a standard passive plank, the RKC variation requires you to interlock your fingers and clasp your hands together, forming a rigid triangle base with your forearms. From this fixed anchor point, actively pull your elbows down toward your toes (without actually moving them) and squeeze your glutes at 100% intensity. This intentional leverage change creates an intense, continuous isometric contraction across the anterior chain, firing the rectus abdominis to pull the pelvis back into a stable, neutral alignment.
The Posterior Pelvic Tilt (Spilling Water Backward)
The Pain Point: On the opposite end of the spectrum, a posterior pelvic tilt occurs when the pelvis rotates backward and downward, flattening the natural, shock-absorbing curve of your lumbar spine. In this profile, the abdominals and hamstrings are hyper-dominant, while the primary hip flexors and lower back extensors (erector spinae) become chronically lengthened and weak. Trying to squat or run with a flat, posteriorly tilted spine forces compressive impact to bypass your musculature entirely and drive straight into your spinal discs.
The Solution:
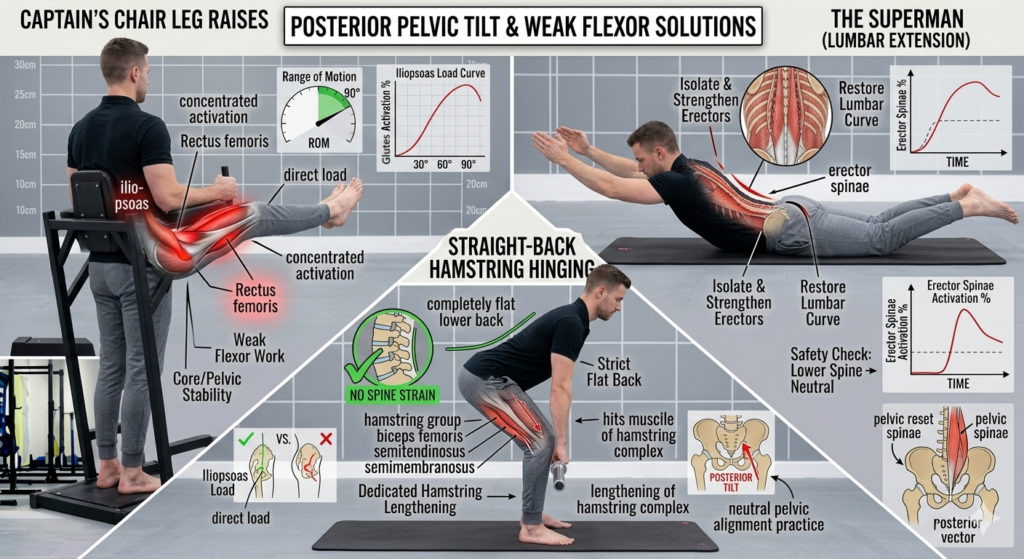
- Captain’s Chair Leg Raises: Hang or support yourself in a captain’s chair (a piece of gym equipment designed to lift and support your body weight with your elbows) and actively pull your thighs up past a 90-degree angle. This concentrated range forces the chronically lengthened and weak hip flexors (iliopsoas) to work against a direct load.
- Straight-Back Hamstring Hinging: Because tight hamstrings continuously anchor the back of the pelvis downward, dedicated hamstring lengthening is essential. Focus on doing Romanian Deadlifts (RDLs) or standing stretches with a completely flat lower back, ensuring the stretch hits the belly muscle rather than straining the lower spine.
- The Superman (Lumbar Extension): Lie face down on the floor and lift your chest and legs slightly off the ground. This isolates and strengthens the weakened erector spinae musculature along the lower back, helping safely restore the natural, shock-absorbing lumbar curve.
The Recovery Timeline: Corrective Limits and Clinical Boundaries
Implementing these cornerstone solutions can yield exceptional corrective results, but true success hinges on recognizing the structural origin of your postural deviations. Gym-based correctives are highly effective if your plumb line variations are primarily functional – driven by a sedentary lifestyle, repetitive desk posture, or minor muscular overcompensations.
However, a strict line must be drawn when deviations stem from deeper underlying causes:
Safe For Fitness Coaching
🟢 Functional sedentary desk posture and soft-tissue imbalances.
🟢 Minor muscular overcompensations and tracking issues.
🟢 Old, fully chronic or fully healed low-grade minor strains.
Requires Clinical Clearance First
🔴 Severe structural spinal configurations (e.g., structural scoliosis).
🔴 Major historic orthopedic surgeries or artificial joint replacements.
🔴 Acute, unmanaged traumatic injuries or active joint pathologies.
If your plumb line deviations are driven by severe structural formations, structural scoliosis, past traumatic injuries, or major orthopedic surgeries, your first step should never be a standard gym routine. In these scenarios, it is imperative to work with a physical therapist or an orthopedic expert before approaching a fitness trainer to pursue long-term physical goals.
What to Expect from a Clinical Evaluation
When consulting a medical professional, they will look far beyond visual symmetry. They may run advanced clinical tests, diagnostic imaging, and dynamic orthopedic assessments to deeply understand your unique anatomical imbalances. Based on these findings, they will prescribe clinical-grade, safe exercises and targeted rehabilitative drills designed to stabilize your joints without risking further structural damage.
Ultimately, your recovery timeline and overall progress will depend heavily on two critical variables:
- The Neuromuscular Severity: True structural bone deviations or neurological conditions demand a conservative, highly managed clinical roadmap compared to transient soft-tissue tightness.
- The Duration Since the Incident: : Imbalances that have been locked into your kinetic chain for years or decades take longer to unravel than recent, acute compensations.
Always secure your structural foundation with clinical expertise first; only once your movement patterns are medically cleared should you begin loading them with heavy gym training.
Frequently Asked Questions
1. What is a static posture assessment plumb line?
A static posture assessment plumb line is a baseline diagnostic tool used to evaluate musculoskeletal alignment against a vertical axis. By dropping a physical or digital line through key skeletal landmarks from both the frontal and sagittal (side) profiles, fitness and medical professionals can systematically spot structural distortions like forward head posture, shoulder drops, pelvic tilts, and knee valgus.
2. What causes scapular winging and how does it impact overhead mobility?
Scapular winging occurs when weak or inhibited stabilizers, most critically the serratus anterior, fail to keep the medial border of the shoulder blade flat against the rib cage. This disruption breaks down the natural 2:1 scapulohumeral rhythm, forcing the glenohumeral joint to overcompensate and rapidly grinding down the rotator cuff tendons during heavy loading or overhead movements.
3. What is the difference between an anterior and posterior pelvic tilt?
An anterior pelvic tilt occurs when the pelvis rotates downward and forward, causing an increased lumbar lordosis (excessive lower back arch) often driven by hyper-tight hip flexors like the psoas major. Conversely, a posterior pelvic tilt occurs when the pelvis rotates backward and downward, flattening the natural curve of the lower back, which is typically driven by overactive, dominant hamstrings and lengthened hip flexors.
4. How does a regular plank differ from an RKC plank for core bracing?
A standard plank often relies on passive bracing, whereas the RKC plank maximizes neuromuscular tension by changing the mechanical leverage. By interlocking the fingers to create a rigid triangle base and actively pulling the elbows down toward the toes while squeezing the glutes at 100% intensity, it forces a powerful isometric co-contraction across the entire anterior chain, firing the rectus abdominis to pull the pelvis into a neutral alignment.
5. Why can extreme foot pronation and collapsed arches contribute to knee pain during running?
While normal foot pronation is an essential phase of running required for structural shock absorption, extreme or unmanaged over-pronation can disrupt upstream biomechanics. When a flat arch collapses excessively under impact, it forces the tibia (shin bone) into a prolonged internal rotation. If this rotation isn’t checked by strong hip stabilizers (like the glutes), it pulls the knee inward into an exaggerated valgus position, altering patellar tracking and placing uneven structural friction on the joint. Pronation is rarely a standalone cause of injury, but rather an interconnected variable in a runner’s overall dynamic kinetic chain.
6. Can deep structural bone configurations or scoliosis be corrected with gym exercises?
No. Gym-based corrective exercises are highly effective for functional postural deviations caused by sedentary desk habits or minor muscular overcompensations. However, deep structural bone configurations, structural scoliosis, or active joint pathologies require formal clinical clearance from an orthopedic expert or physical therapist before any heavy weight loading or fitness coaching begins.
The Posture Assessment Matrix: Why Small Details Matter
When a certified professional sits down with a full diagnostic checklist, they are tracking your entire kinetic chain across multiple planes of view (Anterior, Posterior, and Sagittal).
They use these posture assessment frameworks to draw clear structural lines across your ankles, knees, hips, and shoulders. This comprehensive bird’s-eye view ensures that instead of blindly treating a symptom (like chronic knee pain or a stiff neck), they can trace the issue back to its structural root cause down in your feet or pelvis. By implementing these cornerstone corrections systematically from the ground up, you can step into your next fitness chapter with a body that is completely balanced, injury-free, and built to last.
For – Brands | Businesses | Coaches
If your brand or website needs top-quality blog content or end-to-end blog management, chat with me today. I create content with the same clarity, science-backed storytelling, and motivational rhythm you just read.
I offer blog management and content writing services across diverse sectors, whether your niche is fitness and health (my favorite), technology, lifestyle, or business – I specialize in turning topic ideas into engaging, SEO-optimized blog posts that your readers will trust and love.
Let’s build your business authority online with content that delivers both value and results.
 Chat With Nady on WhatsApp
✍️ Explore Our Blog Writing Services
Chat With Nady on WhatsApp
✍️ Explore Our Blog Writing Services